Sunday, March 25, 2012

Cloud Time


Yesterday I logged some cloud time. I must admit it was pretty cool. My CFII called up Indy Approach and grabbed a pop up clearance. Indy gave us a squawk  code and cleared us up to 4,000 feet.

Once we entered the clouds it was a very different feeling. Throughout my entire life as a pilot I have been trained to AVOID the clouds. Remain 500 feet below them or 1,000 feet above them. Now we are purposely going in the clouds. I have to tell you it is the strangest feeling ever.

Once I entered the clouds I was engulfed in whiteness. The best way to describe it to non pilots is imagine  being in your car with a white sheet being placed over your windshield and you are traveling 130 mph while 3,000 feet above the ground.

Reality hit that I'm no longer in a scrimmage game. I'm in the real deal. I'm flying under REAL Instrument Flight Rules, under REAL instrument conditions. Instinctively I buried my head even further down into the instruments performing my scan.


See the imagine above. This is what's called the 6-pack. Virtually every plane is equipped with the same instruments in this similar layout. The instrument on the top row in the middle is the attitude indicator. Some people also call it an artificial horizon. When you are in the clouds and lose all visual references this becomes your window into the world. You then scan between it and your other instruments to get a mental image of what the aircraft is doing. This is also away to cross track your instruments to make sure you are getting good information.

This is important because while in the clouds I began to get the leans. What this means is I felt as if I was turning and climbing, when I was actually flying straight and level. If I didn't trust my instruments I would have corrected for the turn that didn't really exist, thus putting the plane into a turning descent.

Flying under IFR is serious business and I was reminded again why pilots say this is one of the HARDEST rating to get.

There were pockets of flying when I would briefly pop out of the clouds and be able to see the sky above me. It is absolutely the prettiest thing in the world. It almost makes you feel as if you are touching the hands of God. You look below and you see fluffy cotton candy, above you blue sky shielded by wispy cirrus and stratus clouds and the flicker of sunshine. We were then interrupted by Indy Approach. "Zero-Papa-Foxtrot, traffic 5 miles, 3 o'clock level at 5,000, Heavy - DC-10". My CFII replied "Looking for traffic  0PF". We entered another cloud, and popped up and sure enough a FedEx DC-10 was flying over head us. I really wanted to take a picture, but it was getting bumpy so my hands were a bit busy.

We then asked to return to EYE and got vectors from ATC to shoot the localizer 21 approach at Eagle Creek. I shot the approach, landed, refueled, and put the plane away safely in the hangar.


Wednesday, March 14, 2012

Instrument Training and IFR Flying 101

Well since March began I have hit my instrument flight training pretty hard. I'm somewhere at about 10 hours or so into it and I can tell you that it is CHALLENGING!! This is honestly one of the hardest things I've done in aviation. I remember back when I first started learning how to fly that landing was the hardest. Now it's tackling these advanced maneuvers and procedures.

I've touched on this before in previous post but I'll try to summarize things again. There are two types of flying "rules". These rules are Visual Flight Rules 'VFR' and Instrument Flight Rules 'IFR'. The rules vary depending on your altitudes and airspace, but for the purpose of the blog VFR minimums are 3 statute miles of visibility, and 1,000 foot ceilings. IFR flying minimums are essentially 0 ceiling and 0 visibility. However to land using an Instrument Landing System you need 200 foot ceilings and 1/2 mile visibility. (Pilots, remember this blog is geared towards non pilots, so I know these minimums vary and depends on a ton of factors).

Currently I am a non instrument rated pilot. Which means I can only legally fly under VFR rules. In essence VFR flying requires me to have my head outside the window and using the see and avoid method to avoid obstacles, and visual methods to navigate. This is similar to driving a car, you look outside to see where you are going while occasionally glancing at your speedometer, gps, or whatever gizmo you have in your car.

Instrument flying is the complete opposite. Since you cannot see outside and have no visual references since you are in the clouds; you are relying on the aircraft's instruments to maintain proper attitude, and to navigate.

Flying a plane under real IFR conditions by hand without the use of an autopilot is the equivalent to driving in a construction zone, while eating dinner, changing radio stations, while its raining, speeding, and talking on the cell phone to that person you really don't feel like talking to but you've hit ignore too many times before. Oh yeah, and don't forget the mental math you must be doing, so let's equate that to balancing your checkbook. Now doing any one of these task by hand is really simple and not difficult at all, but doing them all at once is a balancing act which is very challenging and mentally tiring.

My lessons are anywhere between 1 - 1.5hrs long and I can tell you I'm BEAT afterwards. I can fly VFR for about 3 hrs before I get tired and need to stretch my legs.

Navigating under IFR is done just like it was back in WWII. There are 'fixes' or navigational aids located on the ground. These navigational aids are all radio based and basically send out signals. These signals are then picked up by equipment in the airplane to tell you how far you are from the fix, and what radial or angle you are in relationship to the fix.

This is a VOR receiver. VOR's transmits radials in 360 degrees out from the station. My plane's VOR receiver then can be tuned to the radial and I can fly either to the station or from the station. These stations are interconnected throughout the country to form what are called airways. Ever wonder why you always hear planes flying over head? Maybe more so during cloudy days? It's possible you have an airway over your home. These airways are crucial for not only general aviation, but commercial travel. 


This is a visual depiction of what a radial is and how a plane fly's on it. As you can see the top planes are flying to and from the station, while the plane at the bottom is transitioning the area and using the VOR to determine it's location relative to the station.


The instrument above is the primary navigation receiver called an Omni Bearing Selector OBS. The numbers on the outside can be rotated with the OBS knob to select what radial you are tuned to. Then the needle points to tell you if you are tracking from the station or to the station.

This last picture shows an OBS which is tuned to the 360 radial. If the pilot the plane on the 360 radial the needle will swing and line up like the picture above. The key is for the pilo flys t to keep the needle lined up on the radial he/she wants to fly on.

Sunday, February 26, 2012

Currency Renewal

As I look through my log book I realize its time for me to renew my night currency. FAR 61.57 Recent Flight Experience states that "no person may act as a pilot in command of an aircraft carrying passengers or of an aircraft certificated for more than one pilot flight crew member unless that person has made at least 3 takeoffs and three landings withing the preceding 90 days".

Specifically for night experience "No person may act as pilot in command of an aircraft carrying passengers during the period beginning 1 hour after sunset and ending 1 hour before sunrise, unless within the preceding 90 days that person has made at least three takeoffs and three landings to a full stop during the period beginning 1 hour after sunset and ending 1 hour before sunrise." 

So basically what that means is tonight I'm going flying!!! This will be kind of a boring flight, but it will give me a chance to focus on some basic fundamentals and pattern work. I'm a firm believer that solid fundamentals make for solid performance of advance maneuvers.

Saturday, November 5, 2011

Why We Fly

As we dig deeper into fall and winter approaches, aviation changes like usual. A few month's ago I wrote a post about how aviation changes in the dog days of summer. Well now the tide reverses and things switch and you get the complete 180 of the pro's of summer flying and the cons of winter flying. I guess fall would give you a 90 degree switch and you would get the best of both worlds???

As always I'll try to stay very high level as this topic can get so deep that people literally get advanced degrees on this topic. I don't have a PhD in this topic, and chances are you don't either so let's keep it simple for everyone's sake.  

When it gets cold outside the performance of the aircraft increases, the engine runs better, and the air is smoother and has less turbulence. It's not a coincident that this is most pilot's favorite time of the year to fly. However a recent article by the Aircraft Owners and Pilots and Association (AOPA) reminds myself and other pilots of the hazards of flying this time of year. I don't want to go in details because the purpose of this blog is to share my experiences of general aviation, and inspire others to learn to fly. If I discuss the hazards it might frighten people away. 

However, this is the time of year when I not only got my ticket, but I first soloed. I think because of these important dates of my life, I will forever hold a special place in my heart for fall and winter flying. The reason I fly is because of my love for aviation. Every single time I rotate at 55kts, and my wheels slowly rise from the earth at 60-65kts I am truly a student again. I have an addictive thirst for knowledge. The weather is always different, the traffic in the pattern is always changing, ATC is always telling you to do something different, and the list goes on. 

Any pilot who says they don't learn something on each flight should probably hang up their headsets because they have lost the Joy of Flying....

Thank you for your support and I hope to post some awesome pictures soon. Did I mention that pictures even come out better in the winter time?? If you don't believe me, google it! 

Saturday, October 29, 2011

David Clark ANR Upgrade Install and Review

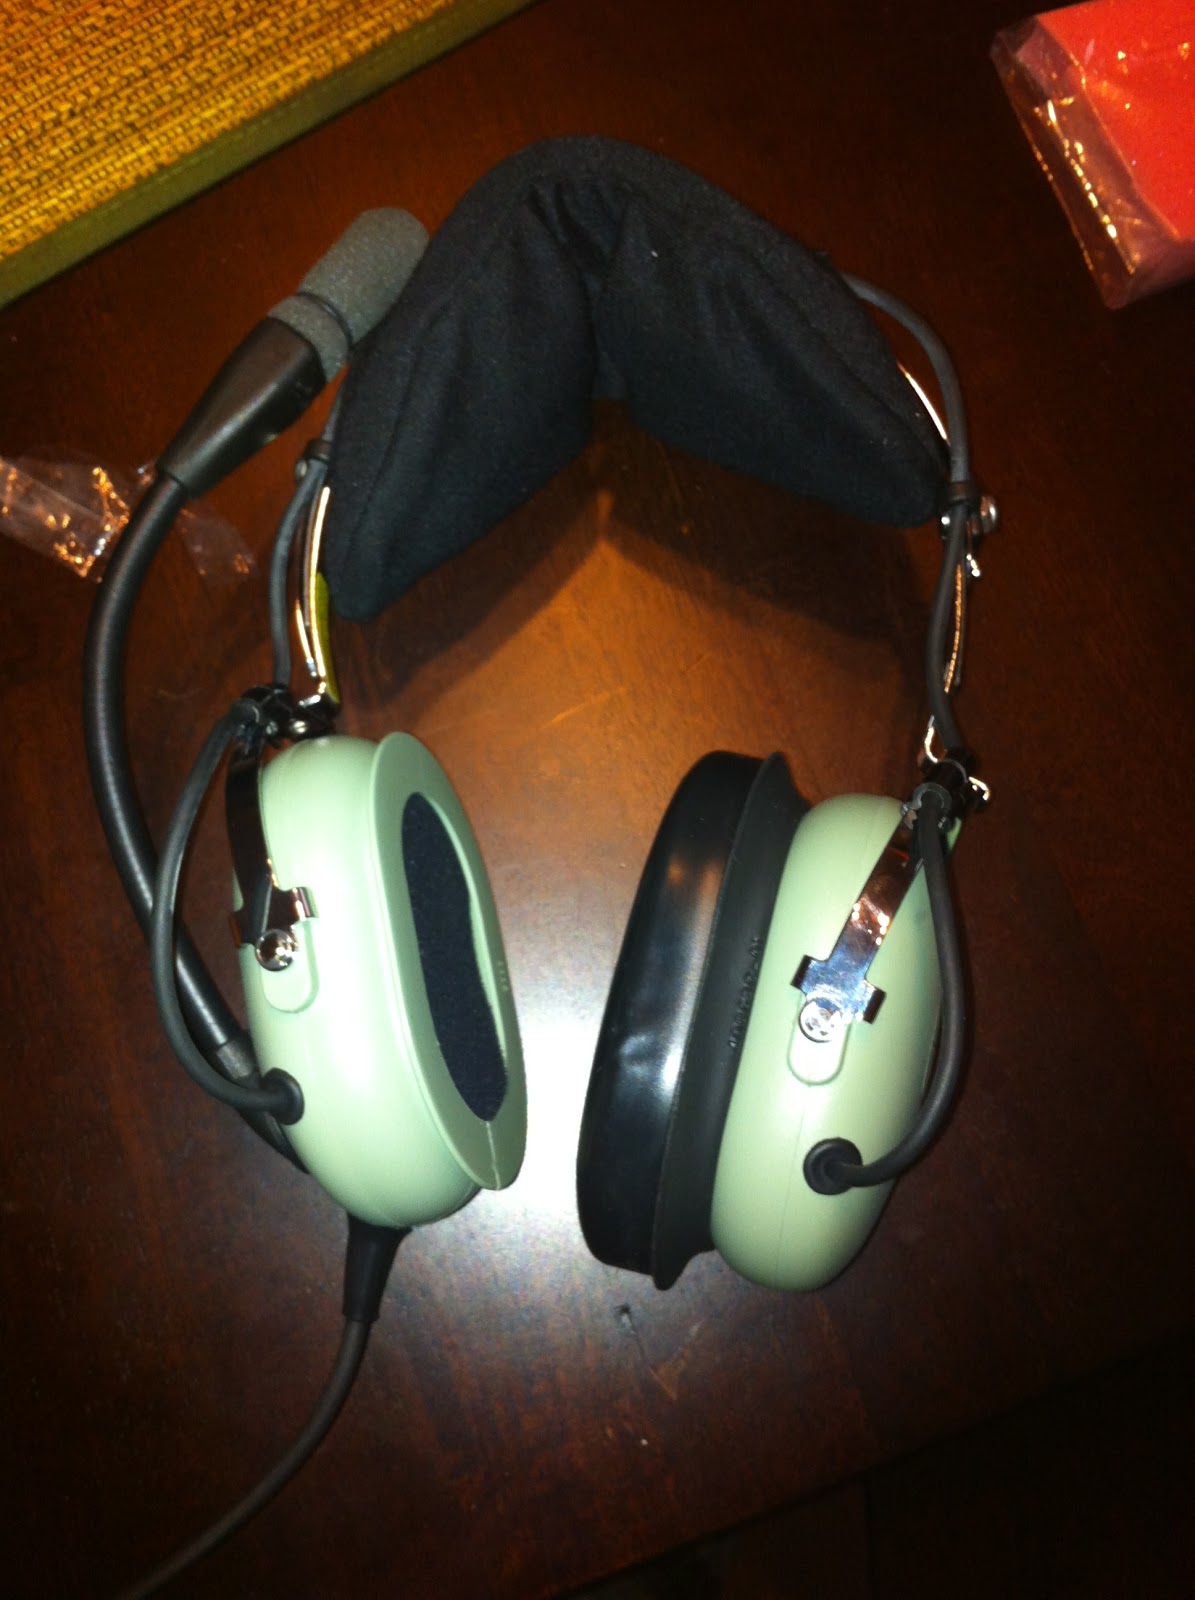
Yesterday I installed an Active Noise Reduction Kit (ANR) to my David Clark H10-13.4 headsets. David Clark is the number seller of passive style headsets. These are the green headsets you see in almost any movie/tv show with an airplane or helicopter. These headsets are build tough. As a matter of fact, so tough that many pilots still own the first pair of David Clark headsets that they purchased many years ago. 

Since many of my readers are not pilots, I want to give you a quick background on what headsets are, how they work, and why they are important. 

Headsets are devices that aid a pilot in doing 3 things. Provide ear protection from wind and engine noise, listen to the radios, communicate on the radio. There are two main types of headsets, Passive and Active. Passive style headsets work by muffling the sound  with sound absorption materials. Active headsets use noise canceling technology to block out the unwanted sounds. Passive Headsets have been around the longest and since they are simple in design, cost the least. That being the case, this is what most pilots start off with including myself. 

Bose and Zulu are two of the most popular makers of ANR Headsets. They are extremely expensive ranging from $700 - $1,200. A company called Headsets Inc. actually makes a kit to convert your passive David Clark headsets to ANR headsets. I was very skeptical at first, however after doing research I couldn't find one bad review on the product. 

The product comes in two flavors, self install or factory install. Along with that there are a host of other upgrades such as auto battery shutoff, upgraded cabling etc. Me being me, and one who likes to save money, I chose the self install option, the auto battery off upgrade, and the upgraded cabling. I detailed the installation below.

The kit comes with everything in the picture below. 
Temperfoam insulation, 3-in-one cable, new crossover cable, battery box, anr modules, and some instructions and wiring diagrams. 

The first step is to remove your existing ear seals. The kit requires either gel ear seals in a new or like new condition. Foam ear seals will not work as they do not provide a proper seal. If you are installing these on an old headset you may want to consider this a good time to replace those old worn out foam earseals with new gel seals. 
The next step is to remove the speaker cover

Once the speaker cover is removed you will see some acoustical foam. Remove that foam to reveal two screws that hold the speaker to the ear cup. Remove those 2 screws to remove the speaker.
Carefully remove the existing speaker to reveal the guts. This can look pretty intimidating at first, but take your time and familiarize yourself with the wires, and refer to the diagrams if you get confused. Remember their are basically 3 wire coming in, the mic, crossover, and plug wires.

Repeat the process for the other cup. Remove the speaker and disconnect the leads.

It's a good idea to find a dvd case to use a spreader to give you some room to work with.  Cut your existing jack cables, and crossover cables. I chose to leave as much wire as possible to give me more room to work with.

Install the new crossover cable, and new jack cables. Use the zip tie to keep the jack cables from slipping out. If you look closely at the picture you will see it. The next step is to solder your connections per the wiring diagram. If you don't have experience soldering get some old speaker wire and practice. It's pretty easy once you get the hang at it. 

Trim the wire tie back neatly.
As you continue to solder don't forget to put the wire wrap on first. Oops, I made that mistake a few times. It's no big deal though, just simply undo your solder and try again. Use a cigarette lighter to get the shrink wrap to shrink.
 Now is the time to install the final connections. You must connect the new wires to the new ANR Circuit boards. This is something that if you have never done before, I recommend taking a few lessons on youtube on. It's still a simple process, but certain techniques must be followed to prevent you from burning up your brand new $160 silicon wafer. The trick is to make sure you tin your wires first, and get a fat bead of solder on the circuit. Just be careful that you don't burn a whole in it, or touch another tracing and you should be just fine. 
 Finally apply the double sided tape, install the original insulation that fits in the deepest portion of the cup, then install the new pink temperfoam. 

Take note of which cup you want to be your left, and which cup you want to be your right. Each cup is marked and it's important for the microphone positioning that are inside your cup. This is the only downside if you like to switch which side is your left or right often. So make sure you decide before you begin installation.


VOILA!!! You are all done!!!!

This mod sounds AMAZING. I tested them out this morning for breakfast. I decided to fly to 4I7 (Greencastle/Putnam County). They have a $5.99 all you can eat breakfast buffet. Yummy. The ANR makes a world of a difference. I wonder how I flew before I had these. God willing, I will never fly without ANR again. For anyone who is on the fence about getting this kit, GET IT!!! If you have basic wiring skills, or have installed a car radio before, save yourself the $50 and install it yourself. If not the folks at Headsets Inc. will install your ANR for you.


Tuesday, October 11, 2011

Richmond Indiana RID

I flew a buddy of mine this past weekend and he recorded some cool clips. I've posted it above. This is what General Aviation is all about!

Wednesday, September 14, 2011

Dog Days of Summer

Being born and raised in Atlanta, I can take the heat with the best of them. I've been out in the sun every summer since I was 2 years old. But I tell you what this summer has been a straight dog. I'm not complaining don't get me wrong, because I'll take this over snow and ice ANYDAY.

But inside of a Piper Warrior with 90% humidity, calm winds, and 95 plus degree heat....You might as well be in a sauna. My flights lately have been night flights to beat the heat. However I have had a few pretty cool flights so far this summer. I flew down to Sikeston , Missouri. It's not too far north of Memphis right where the ohio river joins the mississippi.

For this flight I had the pleasure of being co-pilot for a buddy in his Piper Aztec. This is a twin engine piston engine plane. It has retractable gear and a constant speed prop. It's a pretty nice bird. It can hold 6 people and there luggage and still carry a good amount of fuel. The only bad thing I can say about the plane is that it likes to fly low (Under 8k Feet) and isn't as fast as a Baron or other typical twin engine planes you normally see. But it'll get you there still a heck of a lot faster than a car, and is definitely more fun.

Here are some pictures below of my flight. At the time of the flight Southern Missouri was recovering from the major flooding that they were having. You could actually see many of the fields that were destroyed.