Saturday, November 5, 2011

Why We Fly

As we dig deeper into fall and winter approaches, aviation changes like usual. A few month's ago I wrote a post about how aviation changes in the dog days of summer. Well now the tide reverses and things switch and you get the complete 180 of the pro's of summer flying and the cons of winter flying. I guess fall would give you a 90 degree switch and you would get the best of both worlds???

As always I'll try to stay very high level as this topic can get so deep that people literally get advanced degrees on this topic. I don't have a PhD in this topic, and chances are you don't either so let's keep it simple for everyone's sake.  

When it gets cold outside the performance of the aircraft increases, the engine runs better, and the air is smoother and has less turbulence. It's not a coincident that this is most pilot's favorite time of the year to fly. However a recent article by the Aircraft Owners and Pilots and Association (AOPA) reminds myself and other pilots of the hazards of flying this time of year. I don't want to go in details because the purpose of this blog is to share my experiences of general aviation, and inspire others to learn to fly. If I discuss the hazards it might frighten people away. 

However, this is the time of year when I not only got my ticket, but I first soloed. I think because of these important dates of my life, I will forever hold a special place in my heart for fall and winter flying. The reason I fly is because of my love for aviation. Every single time I rotate at 55kts, and my wheels slowly rise from the earth at 60-65kts I am truly a student again. I have an addictive thirst for knowledge. The weather is always different, the traffic in the pattern is always changing, ATC is always telling you to do something different, and the list goes on. 

Any pilot who says they don't learn something on each flight should probably hang up their headsets because they have lost the Joy of Flying....

Thank you for your support and I hope to post some awesome pictures soon. Did I mention that pictures even come out better in the winter time?? If you don't believe me, google it! 

Saturday, October 29, 2011

David Clark ANR Upgrade Install and Review

Yesterday I installed an Active Noise Reduction Kit (ANR) to my David Clark H10-13.4 headsets. David Clark is the number seller of passive style headsets. These are the green headsets you see in almost any movie/tv show with an airplane or helicopter. These headsets are build tough. As a matter of fact, so tough that many pilots still own the first pair of David Clark headsets that they purchased many years ago. 

Since many of my readers are not pilots, I want to give you a quick background on what headsets are, how they work, and why they are important. 

Headsets are devices that aid a pilot in doing 3 things. Provide ear protection from wind and engine noise, listen to the radios, communicate on the radio. There are two main types of headsets, Passive and Active. Passive style headsets work by muffling the sound  with sound absorption materials. Active headsets use noise canceling technology to block out the unwanted sounds. Passive Headsets have been around the longest and since they are simple in design, cost the least. That being the case, this is what most pilots start off with including myself. 

Bose and Zulu are two of the most popular makers of ANR Headsets. They are extremely expensive ranging from $700 - $1,200. A company called Headsets Inc. actually makes a kit to convert your passive David Clark headsets to ANR headsets. I was very skeptical at first, however after doing research I couldn't find one bad review on the product. 

The product comes in two flavors, self install or factory install. Along with that there are a host of other upgrades such as auto battery shutoff, upgraded cabling etc. Me being me, and one who likes to save money, I chose the self install option, the auto battery off upgrade, and the upgraded cabling. I detailed the installation below.

The kit comes with everything in the picture below. 
Temperfoam insulation, 3-in-one cable, new crossover cable, battery box, anr modules, and some instructions and wiring diagrams. 

The first step is to remove your existing ear seals. The kit requires either gel ear seals in a new or like new condition. Foam ear seals will not work as they do not provide a proper seal. If you are installing these on an old headset you may want to consider this a good time to replace those old worn out foam earseals with new gel seals. 
The next step is to remove the speaker cover

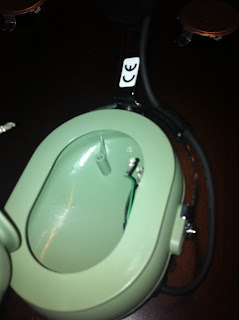
Once the speaker cover is removed you will see some acoustical foam. Remove that foam to reveal two screws that hold the speaker to the ear cup. Remove those 2 screws to remove the speaker.
Carefully remove the existing speaker to reveal the guts. This can look pretty intimidating at first, but take your time and familiarize yourself with the wires, and refer to the diagrams if you get confused. Remember their are basically 3 wire coming in, the mic, crossover, and plug wires.

Repeat the process for the other cup. Remove the speaker and disconnect the leads.

It's a good idea to find a dvd case to use a spreader to give you some room to work with.  Cut your existing jack cables, and crossover cables. I chose to leave as much wire as possible to give me more room to work with.

Install the new crossover cable, and new jack cables. Use the zip tie to keep the jack cables from slipping out. If you look closely at the picture you will see it. The next step is to solder your connections per the wiring diagram. If you don't have experience soldering get some old speaker wire and practice. It's pretty easy once you get the hang at it. 

Trim the wire tie back neatly.
As you continue to solder don't forget to put the wire wrap on first. Oops, I made that mistake a few times. It's no big deal though, just simply undo your solder and try again. Use a cigarette lighter to get the shrink wrap to shrink.
 Now is the time to install the final connections. You must connect the new wires to the new ANR Circuit boards. This is something that if you have never done before, I recommend taking a few lessons on youtube on. It's still a simple process, but certain techniques must be followed to prevent you from burning up your brand new $160 silicon wafer. The trick is to make sure you tin your wires first, and get a fat bead of solder on the circuit. Just be careful that you don't burn a whole in it, or touch another tracing and you should be just fine. 
 Finally apply the double sided tape, install the original insulation that fits in the deepest portion of the cup, then install the new pink temperfoam. 

Take note of which cup you want to be your left, and which cup you want to be your right. Each cup is marked and it's important for the microphone positioning that are inside your cup. This is the only downside if you like to switch which side is your left or right often. So make sure you decide before you begin installation.


VOILA!!! You are all done!!!!

This mod sounds AMAZING. I tested them out this morning for breakfast. I decided to fly to 4I7 (Greencastle/Putnam County). They have a $5.99 all you can eat breakfast buffet. Yummy. The ANR makes a world of a difference. I wonder how I flew before I had these. God willing, I will never fly without ANR again. For anyone who is on the fence about getting this kit, GET IT!!! If you have basic wiring skills, or have installed a car radio before, save yourself the $50 and install it yourself. If not the folks at Headsets Inc. will install your ANR for you.


Tuesday, October 11, 2011

Richmond Indiana RID

I flew a buddy of mine this past weekend and he recorded some cool clips. I've posted it above. This is what General Aviation is all about!

Wednesday, September 14, 2011

Dog Days of Summer

Being born and raised in Atlanta, I can take the heat with the best of them. I've been out in the sun every summer since I was 2 years old. But I tell you what this summer has been a straight dog. I'm not complaining don't get me wrong, because I'll take this over snow and ice ANYDAY.

But inside of a Piper Warrior with 90% humidity, calm winds, and 95 plus degree heat....You might as well be in a sauna. My flights lately have been night flights to beat the heat. However I have had a few pretty cool flights so far this summer. I flew down to Sikeston , Missouri. It's not too far north of Memphis right where the ohio river joins the mississippi.

For this flight I had the pleasure of being co-pilot for a buddy in his Piper Aztec. This is a twin engine piston engine plane. It has retractable gear and a constant speed prop. It's a pretty nice bird. It can hold 6 people and there luggage and still carry a good amount of fuel. The only bad thing I can say about the plane is that it likes to fly low (Under 8k Feet) and isn't as fast as a Baron or other typical twin engine planes you normally see. But it'll get you there still a heck of a lot faster than a car, and is definitely more fun.

Here are some pictures below of my flight. At the time of the flight Southern Missouri was recovering from the major flooding that they were having. You could actually see many of the fields that were destroyed.

Tuesday, March 29, 2011

Instrument landing clips

The first clip is a low hanging overcast that's VFR on top.
http://www.youtube.com/watch?v=a1hFE1BOB0Y&feature=youtube_gdata_player

This clip is a raining day
http://www.youtube.com/watch?v=SacFRH_H6gg&feature=youtube_gdata_player

Fun time is over

Is been almost 16 months since my first solo flight back in December 2009. That was the happiest moment of my aviation life. No matter how far up the ladder a pilot is, whether he is captain k or Neil Armstrong himself, a pilots solo day is equivalent to his birthday in importance. It's a day he never forgets.

I remember my solo like it was yesterday. After I did my 4 take off and landing with my CFI watching me with the radio in hand from the terminal I felt like I was king of the world. I told everyone in the world that I was officially a pilot. At the time I did not have my private pilots license obviously but what I did have was just as good. It was a signed logbook endorsement which gave me the freedom of flight.

I say all this because aviation is a never ending journey of learning. I am indeed a licensed, current, private pilot. I can fly any single engine aircraft anywhere I want. To many that is there ultimate goal. They achieve there license and put things on cruise control and enjoy the privileges that there certificate offers. But for me I have further dreams and ambitions.

As some of you may know I have been interviewing instructors the past month or so and building up x-country time for my instrument rating. The basic requirements for an instrument rating are 50 pic x-country hours, 40 simulated or actual instrument flight hours, with at least 15 of them with a certified flight instructor instrument (CFII). Currently I only have about 3 or 4 hours so I have a long road ahead.

My next blog posts in the future won't have as many cool pictures because I'll be wearing foggles. These look like safety glasses with a view limiter on them so that I can only see my instruments.

I'll be honest, I'm a little nervous about instrument flying. It's completely different from the way I fly now. But it will make me a better pilot and be very rewarding. I'm looking forward to the day when I take off into a 400 foot overcast and bust through a 200 foot overcast at minimums and land at a new foreign location.... I'll try to find some good video clips to show you what it looks like to land a plane through the clouds and pop out at minimums and land.

Sunday, March 27, 2011

GREAT WEEKEND

What an awesome weekend. Saturday morning I got a call from a buddy to fly in his twin engine Piper Aztec to Cole County Illinois to meet another fellow aviator for pancakes. It's about halfway between St. Louis and Indianapolis.

Then on Sunday had an excellent day at church. Then afterwards took my wife to Dayton International - DAY to meet some friends for dinner. I fought a headwind @ 5,500 feet going there and got vectored a bit so it took about an hour 20 minutes to get there. But coming back it only took about 50 minutes @ 6,500 feet. I flew my wife over our house on the way home and we saw the "mega house" off Michigan by Butler's campus.

When we pulled up to the General Aviation Ramp I was greated not only by the friendly folks at Wright Bro's Flyers, but a Canadian Royal Air force F18. Apparently he had some mechanical issues with his fly by wire flight computers. So he had to detour until the Airforce could send a mechanic to fix the problem. He was enroute to an airshow. I felt bad for him because he had been there for a couple of days.


We ate dinner then went to the gun range to shoot a few rounds off. Then back up into the sky!!! What a fun weekend.....

Saturday, March 19, 2011

iPad 2 Full Review

Today I flew my iPad down to Clermont County, Ohio (I69) and visited Sporty's Pilot Shop. They not only have free lunch every Saturday, but you get to meet cool people. This was a fun flight because I got to navigate Class Bravo Airspace and travel quite far.

I got the Wifi Only iPad for a couple of reason. 1) I don't need 3G internet 2) 90% of the places I go have free wifi access. The negative of the wifi only iPad is that it doesn't have a built in GPS. However I've heard from pilot's that the built in GPS on the iPad is not a real GPS. It's an A-GPS which means assisted. It uses the cellular towers to triangulate and help get a fix faster. I guess because of that the GPS is only pretty accurate during straight and level flight. All of this is to say is why I wanted to get an external bluetooth gps module any, thus got the wifi only to save money.

I simple connect my bluetooth gps to my iPad and throw the GPS receiver either in the window or leave it on the passenger seat. I compared the readings on the app to my Garmin 196 and it was virtually identical.

For the modern pilot, I think an iPad is almost a must have accessory. It makes the cockpit much more clean, paper free, and allows the pilot to focus on other things instead like watching out for traffic. I now wonder how did I fly before I had this thing! Also pilots love redundancy. I have my Garmin 196, my iPad, VOR's, and my backup paper charts. With all these options....if I get lost, it's my own fault :)

Happy Flying!!

Friday, March 18, 2011

iPad and Weather

Today after work I wanted to fly to DAY for a party. However a small system was moving through. The ceiling was high and the visibility was good. However being a conservative pilot I aired on caution.

I checked the weather during at planned departure time. It turns out that the system moved through and I could have flown safely!

I guess it goes to the old adage "it's better to be on the ground and wish you were up there than to be up there and wish you were on the ground.

Not all is lost though. This gives me time to play with my new toy. I just became the newest pilot to adopt the iPad. I gave it a test spin on Thursday. It's awesome. This device will revolutionize the aviation industry. Delta, net jets, and a few other airlines have already adopted it or plan to adopt it.

The app I use is Foreflight. It's pretty cool. I will attach some screen shots. When I'm in the plane, the app can connect to my gps so it'll point specifically on the Sectional Chart where I am at! Awesome...


Wednesday, March 2, 2011

Connersville, Indiana (CEV)

Yesterday and today are the first days the weather has been VFR in quite a while. So I took advantage. I flew to CEV after work. The weather was great! I even caught a nice sunset yesterday. As I said before, the pictures don't do these views justice at all. Sometimes I wish I didn't have to look out for traffic and could just stare at the beauty.....These pictures were taken 3/1 and 3/2 at about ol i guess 3,500ft-4,000ft MSL as I climbed up to my cruising altitude of 5,500ft MSL.


 This just looked like a cool shot so I took the picture. You can see my car clean and salt free for once!!